More garage space required…
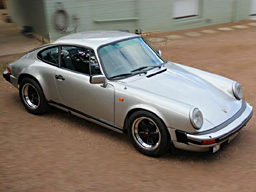
Just added a new 911 to the collection – subscribing to the formula that the correct number of Porsche’s to own is n+1 where n = current number of Porsche’s owned. Have a look at the new page, more content coming over the next few weeks and months. https://project911sc.wordpress.com/my-964-c2/

Project complete – for now.
It’s been a long time since posting, mainly due to my laziness than any lack of progress with the car. The car is now road going and it’s probably got around 1300kms on the motor. Here are some pics with a bit of a rundown.

Believe it or not but it sounds better than it looks.

Ready to drive

Close up

More close ups
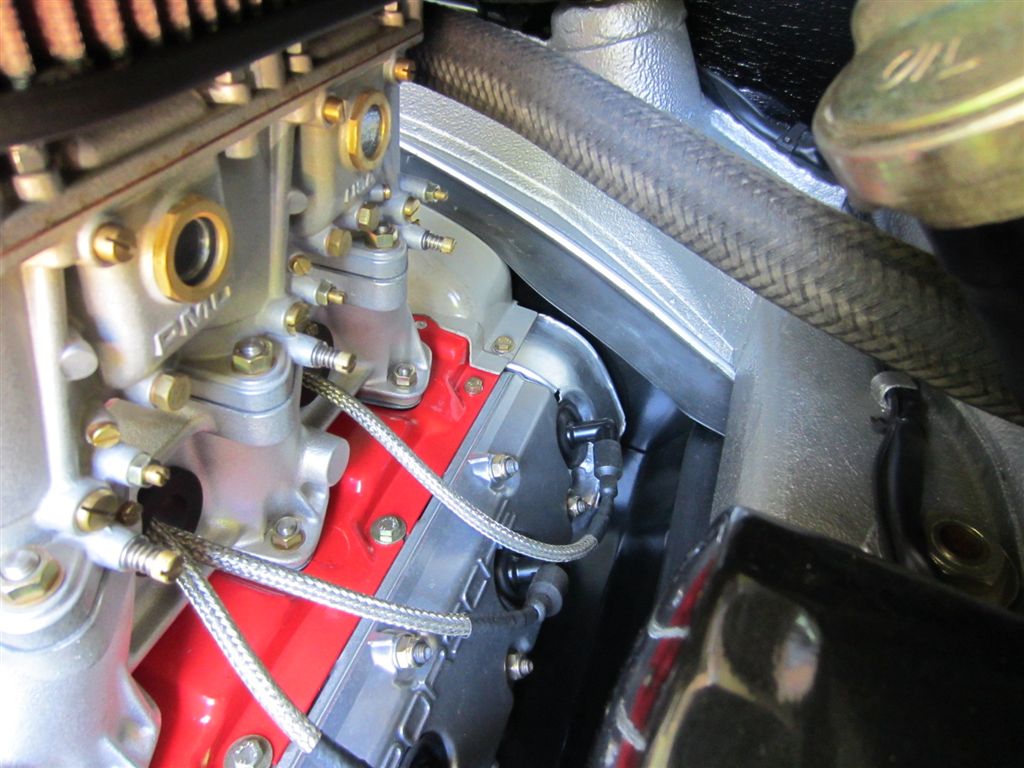
Another close up
When I first collected the car with motor installed I was a bit nevous. It was smokey, hard to start, felt a bit flat and certainly running very rich. There were lots of issues with it sneezing out the carbs so larger idle jets were installed (hence the richness).
It was left in that state of tune while it was sealing itself during run in. Progressively the smokiness reduced but the other symptoms were there. When I hit 1000km’s it was straight back to the mechanic for it’s service. New oil and all other adjustments made and it certainly was running better. The original idle jets were reinstalled. The decision was then made to set it up on the dyno and so I booked in with Melbourne Performance Centre.
I explained to them the flat spot around 2500, the popping throughout various points in the rev range and what I thought was a lazy acceleration up until about 4000.
The results were significant. Sneezing is virtually gone (always a compromise but I opted for the odd sneeze at around 1200 in favour for a better mixture higher in the rev range. I now have about double the power around 1500 rpm which explains the sluggish starts I was experiencing. Top end power is about 17KW more at the wheels and really gets going about 4200. Peak power at about 6200. There is loads of torque and the curve is quite flat. the result is a very strong motor that pulls early in the gear. It revs very freely and before I know it it is ready for the change up.
On the dyno the power numbers seemed a touch lower than expected but torque was 384Nm at the wheels. Needless to say I am very happy with it. Phil and Darren at Auto Coupe have done a great job putting it together.
All focus on the engine but the 915 shifts nicely. With the Rennshift fitted it’s a positive shift and might swing any 915 doubter into a fan.
Enough for now. I plan to do a proper photo shoot of the car – inside and out. I’ll also follow this up with a series of before and after pics.
Thanks for reading
Engine and Trans Rebuild Underway – Update 19 September 2012
UPDATE – 19th September 2012
Big day today. Had the phone call from Phil that the motor and gearbox was ready to install. I couldn’t organise the tow truck quick enough. Looking at the motor I remembered back to earlier days, seeing work like this and dreaming that one day I’d be putting one of those into my car. About a week from now I hope to be driving it.


UPDATE – 27th August 2012
Nearly nearly nearly…. This is the most exciting part of the whole project. The motor and gearbox is virtually finished. Get ready for another update in mid September. I expect that this will be photos and videos of the complet and running car. 27 months in the making.

Just needs carbs and muffler

I’ve seen so many nice engines – it’s hard to believe mine is one of them…
UPDATE – 22nd May 2012

Bottom end together

Stay focused. Look at the engine…..
Some time has passed since updating this post but there is definitely some major progress being made. It’s now a race to have the bodywork finished so I can re-assemble and get down to the mechanic for the install.
As you can see from the pics the assembly process is still in it;s early days but all the prep work is pretty much done. Bottom end is assembled – fortunately the crank and case were OK. One of the bearings was on the way out but we caught it in time and according to the mechanic it is now ‘perfect’. These are words I definitely want to hear!
Rods have had their treatment which included balancing, de-dagging and shot peening. New head studs are in and it’s now ready to have the cylinders and pistons fitted. Heads have been machined and flycut and new valves ordered. Heads are machined with a slight relief which the mechanic says significant aids the heat control, resulting in a much more durable engine. I’m sure the explanantion ss far more technical than that but for now that’s all I really know about it.
As far as the transmission goes the main bearing was fairly loose which means the casing was worn. This resulted in a worn bearing retaining plate which in turn damaged the pinion gear. All this leads to a possible replacement box but I really wanted to keep a matching numbers car so the solution was to machine out the case, press in a sleeve, replace the retaining plate and pinion shaft and away we go. In the end we sourced a good used box and did a bit of mix and match. As well as this all new consumables are on order – in particular the 1st gear dog teeth were shot, only about 2/3 were still there (that explains the dodgey shifting from 1st to 2nd). This all adds to the cost but my 915 will be as good as new very soon.

Some replated hardware

More replated hardware

Sealing kit

Heads ready to go on

915 undergoing open heart surgery

Another angle of the bottom end
ORIGINAL POST – 9th DECEMBER 2011

Now we are getting to the business end….. Had the car towed to the mechanic on Dec 2nd and returned later that day ‘sans’ engine and gearbox.
The brief for my mechanic is to pull it all apart, replace what needs replacing and refinish pretty much everything. I supplied all my parts that have been collected over the last 18 months. What I am expecting is a very tidy looking new 3.2SS. With 46mm PMO’s it should sound superb. In the end I decided to ditch the dual out Dansk Sport in favour of a single outlet. The look is more understated plus I like the idea of not p!ssing off the neighbours – last thing I need is a trip to the EPA for a dB test.
Gearbox will also get some TLC. Whatever needs doing will happen but it will be interesting to see the state of the internals. Shifting was OK but I know there’s going to be some new bits going in.
Aside from the mechanical aspects both the engine and transmission will be cleaned up and various parts replated, powdercoated or painted. I’ve seen a few of Phil’s jobs and I’m expecting this to look pretty special, as well as perform the same.


At the Panel Shop – UPDATE 27th August 2012
UPDATE – 27th August 2012
A fair of time has passed since the last update. I was away for 3 weeks plus a few other distractions got in the way. Car is back and I have just finished the assembly. Just needs the engine. Here’s the pics.


UPDATE – 29th May 2012
Here’s some pics fresh out of the oven. The original plan was to rub back to ‘glass’ but the job is so nice off the gun we are going to leave it. It actually looks a bit more natural with a slight bit of the peel. More pics when I start to get it assembled.

I’m really liking the fresh paint….

Another nice angle
UPDATE – 25th May 2012

Rubbed back. Note the primed area where it was taken back to metal.
It’s coming along now with top coat due any day. The following pics show some of the prep. At this stage car has been rubbed back with some areas taken back to metal – as there was way too much product from previous ‘touch ups’. There was so much on there that the paint was cracking in spots, especially under the rain gutters. It’s all been sorted now and the car is virtually ready for primer filler. These guys are working fast now!
Good news is that nothing nasty has been uncovered, just the excess product which has been rectified.

Close up of rain gutter area that is now fixed

Other side

There was a fair bit of rubbing back on the door posts.

UPDATE – 17th May 2012
First update in about a month but there has been plenty going on in the interim – I’ve just been lazy updating the blog. There’s changes with the bodywork, engine, transmission and interior but I’ll post updates separately. For now it’s the body work.
The car currently sits awaiting a final coat of primer-filler and then the whole car will be rubbed back and then colour coated. Colour is probably about 2 weeks away. Here’s some pics but I’ve added a bit more text after the images.


Rain gutter area stripped back to metal and initial priming done

It used to be so clean!!!

Interior disassembled as much as it’s going to be.

Door inners re-blacked. It’s the details that count..
To date the guards have been prepped. I ended up replacing the RHD front guard as the origianl had some rust and rather then attempt a repair it was easier and more cost effective to replace it. I also replaced the rear bumper for the same reason.
The cracking in paintwork around the rain gutters was a result of too much pain on previous repairs. This area was brought back to metal and it was discovered that the car had more than one previous paint job. It appears that each owner had a go at making the car look as good as new. The end result was too much paint and so the rub down will sort this out – this has partly caused a delay longer than expected. I’m confident with Frank who is doing the job, he knows I want a top job and he is working accordingly. We’ve discussed how he will paint the panels and the end result is that the jambs will be done and then the entire car painted with panels attached – this came from consultation with his sprayman and the fact the car is silver metallic.
Other minor points are that the areas that scared me the most were the sills – but they are OK. I had some polished sill guards and I suspected they were covering up some nasty surprise. This wasn’t the case which was a huge relief. When the car goes back together I’m putting the factory black rubber ones on – less bling and more class in my opinion.
UPDATE – 12th April 2012
Dropped in the collect the window trim which will be powder coated, along with the door handles and other external trim work. I was a little worried what it would look like with the windows out, in particular potential rust around the front windscreen. The was also a spot at the top of the driver side rear window but this is fine. A bit of cleaning back and it will be good. Not really worth pics but I thought I’d add these.
The car is now in the hands of Frank, who is going to fix up all the small blemishes and give the car a full respray. The pics make the car look good already butplenty are small issues I want fixed. Door jambs are rough (previous respray), rear quarters need to be reblocked, couple of small runs, some chips, a couple of small parking dents, and refinished lower panels all add up to the full respray.
Some before pics -after spending a couple of hours removing doors and mirrors.


Interior Project – Update 27th August 2012
UPDATE – 27th August 2012
Well – the interior is now officially finished. Fitting the door panels involved fixing up the mirror and central locking wiring plus also fabrivating a tempalte to cover up the old 6×9 holes in the door itself. I’d say there was 3-4 hours in each door not including making the door panel itself. Anyway, it’s all done and I am very happy with the level of finish for an amateur (being me!).

New carpet and dyed seats / parcel shelf

New seats at the front

All shows RSA door panels.

One finished door panel.

Not my car but these are the seats I’m using. Exposed floorboards are like mine as well – just the steering is on the wrong side in this car.
Like everything else I have completely removed the interior except the dash and it’s attached bits. This gave me the opportunity to rethink the interior and so I made the following decisions:
- RS America door panels – always loved them and now I’m going to have them..
- Pulled the front seats to clean undeneath and they were so heavy I’m putting in R replicas
- New carpet – still blue but darker and more suitable for extra black bits
- Dyed rear seats and door tops black (from navy blue)
- Remove the old 6×9’s in the door and replace with 6.25 = much nicer looking and sounding
More pics but also more text below:

Carpet cut and bound

Love it or hate it – these are carpet covered rear door panels. For that luxurious touch 🙂

Some seals and seat belt action..

Dyed rear seat back plus some bumper trim and engine seal
The door panels came up well. I made them up using a template, some 3mm MDF and a jigsaw. After they were cut I sprayed with 3 light coats of clear 2 pack – excessive maybe but I had the paint so it was really no cost to me. Now I know they are waterproof!
I’ll be using the red nylon pulls but also bought black in case the red was a bit too bright. At the moment I’m loving the red.
Seats are Cobra R replicas. They are new and I have all new sliders and brackets. I bought these from a very nice fellow Porshce enthusiast. I’m really happy and can’t wait to install them. They are immensely lighter than the electric ones I had.
I had some carpet from when I redid the front mats. The new carpet is darker (more midnight blue) than what was in there. I am going to a predominantly black interior. Fashion police will tell you blue and black don’t match but I like this combo.
I dyed the rear seats and door tops black. I used the same product to do the hard plastics such as door locks and interior door handle bezels. The result is excellent and it all looks new. The rear parcel shelf has also been dyed.
When re-covering the rear side panels I decided carpet was a nice option. I’ve seen this before and I think it looks good. The kids decided it would be nicer for them – as they are pretty much the only ones small enough to fit back there anyway.
In the pics you’ll see how it’s come up. Everything is pretty much ready to fit – just need a painted car back in my possession! As a side point you’ll see some external rubbers that have been reconditioned. I’m very happy with these as well.
Exterior Paint – The Unplanned Project….

Stripped and a coat of Wurth Rust Converter - to be sure!

Rear fender extension - needs acetone to clean off excess Wurth Rust Converter

Etch primed - just the bumpers and rear hinges to strip and etch
With so many ‘while you’re in there’ projects going on I have finally surrendered to getting the exterior redone. It’s not that it’s bad or actually really ‘needs’ doing but it was always on the car and it seems like a more efficient time to do it. I had stripped back all the lower panels as they were a bit worse for wear so they needed painting anyway. The dilema I had was with colour matching, especially for a metallic silver.
The colour of the car as it is does not match the formula colour provided by the local Glasurit supplier. This is what I had purchased for the wheel wells, engine bay and front boot. I knew it was off but as the exterior was to be painted at some point I wasn’t concerned. I then had some paint colour matched for the lower panels (fender extension, valance’s, bumpers).
When I thought about it it didn’t seem to make sense to paint it, only to strip it back and repaint again sometime in the next year or 2. With this I contacted a local paint guy who I’ve done some other work for and he came over for a look. A couple of days later he’d prepared a quote based on rub back and paint but also included gapping the panels. I would be responsible for dressing up the bumpers with trim and putting back all the lower panels. No problem..
The quote was very agreeable and so it’s booked in. The car will be in mid March and hopefully ready mid April. I contacted the mechanic and he said the motor and trans will be done about then so the timing is good.
When it’s all done, it should be pretty much a full resto – with a paint job I can love! Here’s pics of the stripped and etch primed panels. They’ve since had Wurth SKS on the right parts so nothing more for me to do – just get them to the painter. I’ll be stripping the bumpers and rear lid hinges but that’s about it.
Engine Bay Respray
Just like the underbody this needed a really good clean up, some minor repair and then a recoat. This time I decided to do only a very light Wurth SKS, really only to even out the finish. I went down this path because the original coating was still largely intact. Only needed a bit of work around the base of the shock towers and around the trailing arm mounts on the torsion tube. Now for final cleaning of components and reaassembly – the fun part! Cleaning up the engine bay remined me how much I really hate the grubby work.

Painted - ready for reassembly

The starting point

Clean up in progress

Bit of primer - Glasurit (expensive stuff - ouch)

Bit of Wurth SKS

Another angle of the finished job

And another

And finally this
Custom Footwells – Updated 21st Nov 2011
UPDATE – 21st November 2011
I finally got around to finishing the footwells. The final touch was a new piece of carpet on the passenger wheel well plus a better floorboard mounting point. I ended up going to a mdel shop and picking up what is effectively a 15mm M6 thread extender. Ithen use a shallow head M6 bolt to secure it in place. The pictures don’t really do it justice – it looks very neat.

Finished - new carpets make a difference to overall presentation

Should've taken the phone of the seat!

The thought of customising can often bring a shudder to the purist. In my case I hope that it’s all done for the betterment of the car. I had a need to make up a new dead pedal since the whole passenger floorboard setup had be changed. After removing the A/C I decided that this was an opportunity to give the passenger some proper legroom. If you’ve been in an A/C RHD 911SC you’ll know that your knees almost touch your chest – even with the seat right back!
After purchasing the beautiful Rennline non A/C floorboard for passenger plus driver board I decided to back them with vinyl. I wanted to expose them and liked the hole punched version. The only drawback was the see through nature, so I vinyl backed them. The idea is to place then over the carpet and it’s kind of a Singer look. A bit racer but not hardcore. I like it, not everyone will.
The dead pedal is made of 1.6mm alumium sheet, light and strong. It’s covered in the same vinyl as the floorboards and also the console that I recovered. I think consistency on the finishes is important for a neat and quality look.
I also had new carpets made up. The passenger is shorter and tucks under the board. The edging also follows the floorpan a bit better than factory. The driver carpet is almost the same, only change is the larger vinyl panel so my heels don;t wear the carpet – the idea is it will stay nicer for longer. I always seem to wear carpet in all my cars!!
Anyway, here’s some pics of the progress.

Aluminium cut and bent into shape.

Vinyl glued on

Test fit - pre vinyl

Test fit - post vinyl

Test fit - with console (took me 2 goes at recovering that thing)
Toolkit
I have now assembled my toolkit. To non early 911 people it might seem like an odd thing but getting together a complete and good condition kit is much harder than you’d think. In the end I believe I have all the pieces plus a nice clean bag. Only the tow hook and sunroof winder could use a replate which I can throw into the next batch.
Needless to say this kit will not actually get used, just stored in the car for the sake of completeness. I’ll keep regular tools for emergency breakdown work (which of course won’t be happening!).
As an extension to this I have an aftermarket air compressor but I’m happy with this. I’m not going to lose sleep over not having the genuine pump, most of them are dead after 30 years anyway. And as for sourcing the original gloves and plastic bag for a flat tyre – I’ll leave that for the concours guys.

Front Boot Restoration – Update 23/10/11 – Complete
UPDATE – 23rd October 2011
With the fuel tank in the front boot is now 99.9% finished. I’m pretty happy with it. The fuel tank had previously been repaired with metal patches so I smoothed the edges of the welded patches as best I could and recoated. 4 hours on the wire brush to get it back to metal was mind numbing to say the least!


UPDATE – 12th September 2011
Paint decal just got back from the printer. I’m pretty happy with the result, not perfect but very close, certainly close enough for this application.

UPDATE – 26th August 2011
Bar the fuel tank and bonnet seal I finished off the front boot today. I’m very happy with how it’s come together.
Here’s some pics. Note the Y connector which is installed to allow fresh air through the a/c dash vents.

With the Rennline Blower Motor Cover (note Elephant Racing strut brace!)

Showing off the resfreshed ventilation system - including new hoses
UPDATE – 21st August 2011
Inch by inch….. Put the bonnet lid back on today. Also have tidied up most of the wiring and the lare part of the ventilation system back in – amazing how much grime in the distributors. Hoses have been ordered plus I found a ‘y’ connector so I can divert some fresh air into the dash vents now the A/C has gone. It will compromise flow to pasenger side but we’ll see how it goes. If it’s not up to standard I’ll work out another solution.


UPDATE – 11th August 2011
Not too much to report but starting to assemble the front boot. Here’s a pic of the early stages of tidying up the wiring.

Putting back the pieces - much quicker to take it apart than re-assemble

Jack in place but will be powdercoated next time I'm getting some parts done

UPDATE – 4th August 2011
Finally got some more real progress. Been waiting for some warmer weather to paint the front boot plus my weekends have been jam packed lately.
I’ll let the pics tell the story but in short the process was cleaning up the surface which involved removing that tar around the shock mounts. A bit more minor repair work and then hit it with high build primer. The front section had some SKS applied then time for colour. I’m using Glasurit Line 55 – beautiful quality paint.

Primed and SKS'd

More SKS action

Base and clear down

Maybe a bit too glossy for the purist? Still looks good to me

Better get a close up
UPDATE – 13th June 2011

Bonnet off

Bit more prep to do, then mask and prime

Getting that tar off the shock towers.............
Made some good progress today. Did most of the prep work, just a few more areas to cover then final clean, mask and prime. I’ll be applying Wurth SKS around the front – just a light coat or 2. The rest will get some light priming and then colour. When this is done I’ll tackle the tank abd can then start assembling. I purchased some rolls of black fsbric tape which I’ll use for the wiring – much nicer and OEM looking than PVC tape.

Before the 'before' pic (except the new carpet!)
With the suspension, brakes and rest of the underbody now under control I have diverted my attention to the front boot. I had intentions of doing this later but I figured now that the car has been off the road for 12 months another month is fine.
Ideally I would completely remove everything but it’s just not practical for me to do this. I am drawing the line and not removing the dash ‘bits’ including the wiring. Instead I have removed most of the plugs, hoses, etc and will mask it all back. I’ll try and spray so that there is no hard line so that it blends as much as possible. The blend area will be covered by the heater components and aluminium cover anyway, plus the whole thing gets covered in carpet so it’s not really going to compromise the job. One day I might do a complete ground up, bare metal, rotisserie resto so it can wait till then – although it will probably be on another car.
Here are some before pics plus some images of what’s been removed so far.

Pre heater bits, master cylinder, some wiring removal

LHS - to help me remember what goes where.

RHS - close up for later reference

Fuse box wiring, fuel pipes, strut tar - yuk!

Front RHS - shows bumper shock repair

Front LHS

Dash area with a few bits removed

Got to get that tank out - pity it's got 50 litres of fuel in it.....